Administrator Guide
This section provides guidance for administrators managing the BETIF/DIFAET system. It covers installation, configuration, and maintenance tasks to ensure the system runs smoothly. The scripts shown below are also available in the helper-scripts repository.
Kernel-based Virtual Machine (KVM) Installation
The BETIF-DIFAET machine runs AlmaLinux 9 as its operating system, and, as is common across many Linux distributions, it supports Kernel-based Virtual Machines (KVM) for virtualizing bare-metal resources. KVM is a full virtualization solution for Linux on x86 hardware containing virtualization extensions (Intel VT or AMD-V). This tool allows to run multiple virtual machines running unmodified Linux or Windows images. Each virtual machine has private virtualized hardware: a network card, disk, graphics adapter, etc.
In order to test the steps to create the computing platform, 4 VMs have been spawned based on AlmaLinux 9 as Operating system and 16 vCPUs, 32 GB of RAM and 80 GB of disk space, through
the virt-install interface.
Listing 1 can be used to create a virtual machine acting as a master node for the BETIF-DIFAET system.
#!/usr/bin/env bash
vm_name='alma9-test-master'
vm_memory='32768'
vm_cpus='16'
vm_disk='/var/lib/libvirt/images/AlmaLinux-9-GenericCloud-latest.x86_64.qcow2'

ci_user_data='user-data'
ci_network_config='network-configv3'
qemu-img create -f qcow2 \
    -b /var/lib/libvirt/images/AlmaLinux-9-GenericCloud-latest.x86_64.qcow2 \
    -F qcow2 /var/lib/libvirt/images/rke2-master-AlmaLinux-9-test-master.qcow2 80G

vm_disk='/var/lib/libvirt/images/rke2-master-AlmaLinux-9-test-master.qcow2'

virt-install \
    --connect qemu:///system \
    --name "$vm_name" \
    --memory "$vm_memory" \
    --machine q35 \
    --vcpus "$vm_cpus" \
    --cpu host-passthrough \
    --import \
    --cloud-init user-data="$ci_user_data" \
    --osinfo name=almalinux9 \
    --disk "$vm_disk" \
    --virt-type kvm \
    --network network=private-net \
    --network network=default \
    --noautoconsole
Listing 2 can be used to create a virtual machine acting as a worker node for the BETIF-DIFAET system.
#!/usr/bin/env bash

if [ -z "$1" ]; then
    echo "Usage: $0 <worker-number>"
    exit 1
fi

N="$1"
vm_name="alma9-test-worker-$N"
vm_memory='32768'
vm_cpus='16'
vm_base_disk='/var/lib/libvirt/images/AlmaLinux-9-GenericCloud-latest.x86_64.qcow2'

ci_user_data='user-data'
ci_network_config='network-configv3'

vm_disk="/var/lib/libvirt/images/rke2-master-AlmaLinux-9-test-worker-$N.qcow2"

qemu-img create -f qcow2 -b "$vm_base_disk" -F qcow2 "$vm_disk" 80G

virt-install \        --connect qemu:///system \
    --name "$vm_name" \
    --memory "$vm_memory" \
    --machine q35 \
    --vcpus "$vm_cpus" \
    --cpu host-passthrough \
    --import \
    --cloud-init user-data="$ci_user_data" \
    --osinfo name=almalinux9 \
    --disk "$vm_disk" \
    --virt-type kvm \
    --network network=private-net \
    --noautoconsole
A : Private network interface was also created to enable direct connections between the different VMs which for debug and testing purposes is still left open to allow direct access to the worker nodes. In the actual deployment this network will block access to the worker VMs, leaving only the Master accessible via SSH.
<network>
  <name>private-net</name>
  <forward mode='nat'/>
  <bridge name="virbr1"/>
  <ip address="10.10.142.1" netmask="255.255.255.0">
    <dhcp>
      <range start="10.10.142.100" end="10.10.142.200"/>
    </dhcp>
  </ip>
</network>
Turn on GPU Virtualization
Up until now, the creation of VMs has relied on virtualization technologies (e.g., VT-x for Intel CPUs), which do not expose hardware connected to the host machine via a PCIe interface.
To enable the passthrough of PCIe expansion devices, such as GPUs or FPGA accelerator cards, VT-d (Intel) or AMD-V (AMD) must be activated in the BIOS setup menu.
Once enabled in the firmware, the procedure continues in the host operating system: PCIe passthrough must also be allowed in the kernel.
Run:
find /sys/kernel/iommu_groups/ -type l
If no output is returned, the kernel boot options must be updated.
On AlmaLinux 9, with an Intel CPU and chipset, this can be done with:
grubby --update-kernel=ALL --args="intel_iommu=on iommu=pt"
After a reboot, the iommu_groups folder should be populated with all devices that can be passed through to VMs.
To use a device inside a VM, it must not be in use by the host system, i.e., the default driver must not be loaded.
For example, with two identical GPUs, a rule must be added at boot time in /etc/udev/rules.d/99-vfio.rules:
ACTION=="add", SUBSYSTEM=="pci", KERNEL=="0000:<PCI-ID of device>", DRIVER=="", ATTR{driver_override}="vfio-pci"
The PCI-ID can be retrieved using lspci.
Next, load the vfio-pci driver, which is responsible for virtualization handling:
modprobe vfio-pci
Important
Due to issues with the order in which rules are applied during boot, vfio-pci is not yet loaded automatically.
This command must therefore be run manually after every reboot. The driver will automatically attach to the configured hardware.
Finally, update the operating system configuration (initramfs) with:
dracut -f
At this point, a VM with access to a GPU can be create with the following instruction:
virt-install \
   --connect qemu:///system \
   --name "$vm_name" \
   --memory "$vm_memory" \
   --machine q35 \
   --vcpus "$vm_cpus" \
   --cpu host-passthrough \
   --import \
   --cloud-init user-data="$ci_user_data" \
   --osinfo name=almalinux9 \
   --disk "$vm_disk" \
   --virt-type kvm \
   --network network=private-net \
   --network network=default \
   --noautoconsole \
   --hostdev <PCI-ID of device>
Setting up the GPU Worker Node
To make the GPU deployable in the k8s cluster, NVidia’s drivers are needed in the worker node housing the virtual GPU.
After an update of the kernel, some utilities are useful/needed to move forward
dnf check-update --security
dnf upgrade --security
dnf install pciutils
dnf install epel-release
dnf install dkms gcc
Then the Nvidia Toolkit and driver have to be installed, following the instruction from [GPU1]:
dnf config-manager --add-repo https://developer.download.nvidia.com/compute/cuda/repos/rhel9/x86_64/cuda-rhel9.repo
dnf clean all
dnf install cuda-toolkit-12-4
dnf module install nvidia-driver:580-dkms
In order to actually add the nvidia driver to the kernel run dkms status and then
dkms install nvidia/<version>
reboot
Once the node is running after the reboot, it is possible to check if the driver is working by running nvidia-smi
Important
It is possible that the open-source driver nouveau is used instead of the proprietary one from Nvidia, if that is the case it can be fixed with the following
sudo tee /etc/modprobe.d/blacklist-nouveau.conf <<EOF
blacklist nouveau
options nouveau modeset=0
EOF
dracut --force
reboot
NFS server
All pods spawned by JupyterHub will contain a persistent-storage folder hosted in a NFS server.
The procedure for provisioning this storage starts from launching in a fresh VM
dnf install nfs-utils
systemctl enable --now nfs-server
Then the folder to export is created with sudo mkdir -p /srv/nfs/k8s and its owner and r/w permissions are changed to
chown -R nobody:nobody /srv/nfs/k8s/
chmod -R 0777 /srv/nfs/k8s
Finally, the rules of the export are set and the filesystem is made visible
/srv/nfs/k8s *(rw,sync,no_subtree_check,no_root_squash)
exportfs -ra
VM Configurations for FPGA Virtualization
Deployment parameters
Replace the placeholders below with the values for the target deployment. Subnet placeholders include the CIDR prefix; gateway and host placeholders contain a single address.
Item |
Value |
|---|---|
Existing cluster hypervisor |
|
FPGA hypervisor |
|
Existing cluster VM network |
|
Existing cluster VM gateway |
|
Existing cluster netmask |
|
Existing cluster DHCP range |
|
FPGA worker VM network |
|
FPGA worker VM gateway |
|
FPGA worker netmask |
|
FPGA worker DHCP range |
|
RKE2 endpoint |
|
FPGA worker VM |
|
FPGA worker address |
|
Former libvirt NAT address |
|
External connectivity test |
|
HyperB uplink |
|
HyperA uplink |
|
FPGA Card functions on HyperB |
|
Guest OS |
AlmaLinux 9 |
Validated guest kernel |
|
Validated XRT |
|
1. One-time routed network setup for adding external VM to the cluster
1.1 HyperA: private-net
private-net must use routed mode. Its persistent definition is:
<network>
  <name>private-net</name>
  <uuid>928084d2-145c-4d6b-a749-20f685df7bc5</uuid>
  <forward mode='route'/>
  <bridge name='virbr1' stp='on' delay='0'/>
  <mac address='52:54:00:2c:f5:50'/>
  <ip address='<CLUSTER_VM_GATEWAY>' netmask='<CLUSTER_VM_NETMASK>'>
    <dhcp>
      <range start='<CLUSTER_VM_DHCP_START>' end='<CLUSTER_VM_DHCP_END>'/>
    </dhcp>
  </ip>
</network>
When rebuilding the network, stop the VMs attached to it, then redefine it:
virsh net-destroy private-net
virsh net-define private-net-route.xml
virsh net-autostart private-net
virsh net-start private-net
Add the route to the FPGA worker subnet:
ip route add <FPGA_WORKER_SUBNET> via <HYPER_B_LAN_IP> dev enp3s0f0
Restore outbound Internet access for the existing cluster VMs:
iptables -t nat -A POSTROUTING \
  -s <CLUSTER_VM_SUBNET> \
  -o enp3s0f0 \
  -j MASQUERADE
1.2 HyperB: k8s-routed
Create k8s-routed.xml:
<network>
  <name>k8s-routed</name>
  <forward mode='route'/>
  <bridge name='virbr2' stp='on' delay='0'/>
  <ip address='<FPGA_WORKER_GATEWAY>' netmask='<FPGA_WORKER_NETMASK>'>
    <dhcp>
      <range start='<FPGA_WORKER_DHCP_START>' end='<FPGA_WORKER_DHCP_END>'/>
    </dhcp>
  </ip>
</network>
Define and start it:
virsh net-define k8s-routed.xml
virsh net-autostart k8s-routed
virsh net-start k8s-routed
virsh net-dumpxml k8s-routed
Enable forwarding:
sysctl -w net.ipv4.ip_forward=1
Add the route to the existing cluster network:
ip route add <CLUSTER_VM_SUBNET> via <HYPER_A_LAN_IP> dev eno1
Persist it in the existing NetworkManager profile:
nmcli connection modify "System eth0" \
  +ipv4.routes "<CLUSTER_VM_SUBNET> <HYPER_A_LAN_IP>"

nmcli device reapply eno1
Restore outbound Internet access for VMb and save the active rules:
iptables -t nat -A POSTROUTING \
  -s <FPGA_WORKER_SUBNET> \
  -o eno1 \
  -j MASQUERADE

iptables-save > /etc/sysconfig/iptables
Check the final state:
ip route get <RKE2_SERVER_IP>
sysctl net.ipv4.ip_forward
iptables -t nat -S POSTROUTING
Expected route:
<RKE2_SERVER_IP> via <HYPER_A_LAN_IP> dev eno1
2. Configure the FPGA worker VM
The VM must have only the routed cluster NIC. Do not keep an interface connected to libvirt’s default network; that caused RKE2 and Flannel to advertise <OLD_NAT_IP>.
Edit the VM if already created:
virsh shutdown alma9-worker-fpga
virsh edit alma9-worker-fpga
The remaining interface must use k8s-routed:
<interface type='network'>
  <source network='k8s-routed'/>
  <model type='virtio'/>
</interface>
Remove any interface containing:
<source network='default'/>
The VM definition must also contain both FPGA Card PCI functions, 0000:01:00.0 and 0000:01:00.1. The existing VM creation/helper scripts on HyperB are used to add them.
3. Prepare the FPGA on HyperB and start the VM
Confirm the host PCI addresses:
lspci -Dnnk -d 10ee:
Load the validated base platform when required:
source /opt/xilinx/xrt/setup.sh
xbmgmt program --base -d 0000:01:00
Bind both functions to vfio-pci before starting the VM:
modprobe vfio
modprobe vfio_pci

echo 0000:01:00.0 > /sys/bus/pci/drivers/xclmgmt/unbind
echo 0000:01:00.1 > /sys/bus/pci/drivers/xocl/unbind

echo vfio-pci > /sys/bus/pci/devices/0000:01:00.0/driver_override
echo vfio-pci > /sys/bus/pci/devices/0000:01:00.1/driver_override

echo 0000:01:00.0 > /sys/bus/pci/drivers_probe
echo 0000:01:00.1 > /sys/bus/pci/drivers_probe

lspci -k -s 01:00.0
lspci -k -s 01:00.1
Both functions must show vfio-pci before starting the VM.
Inside VMb, the final network state is:
ip addr
ip route
Expected route:
default via <FPGA_WORKER_GATEWAY> dev eth0
<FPGA_WORKER_SUBNET> dev eth0
4. Install XRT and the FPGA platform packages in VMb
4.2 XRT 2.26.0
Install the known-good RPM when it is already available:
dnf install xrt_202620.2.26.0_9.8-x86_64-xrt.rpm
If the RPM must be rebuilt, the successful build path was:
dnf install git
git clone https://github.com/DrWatt/XRT.git

source XRT/src/runtime_src/tools/scripts/xrtdeps.sh
export PATH=$PATH:/usr/local/bin

mkdir -p /home/clouduser/firmware/xilinx
mv sched*.bin /home/clouduser/firmware/xilinx/

cd XRT/build
./build.sh -ertfw /home/clouduser/firmware/xilinx/ -noert
cd Release
dnf install xrt_202620.2.26.0_9.8-x86_64-xrt.rpm
The DKMS source required the local qdma_mbox.c compatibility edit:
vi /usr/src/xrt-2.26.0/driver/xocl/lib/libqdma/QDMA/linux-kernel/driver/libqdma/qdma_mbox.c
The timer callback uses:
container_of(t, struct qdma_mbox, timer);
Rebuild the module:
dkms remove xrt/2.26.0 --all
dkms add -m xrt -v 2.26.0
dkms build -m xrt -v 2.26.0 -k "$(uname -r)"
dkms install -m xrt -v 2.26.0 -k "$(uname -r)"
4.3 FPGA platform packages
Install EPEL and use the existing /etc/yum.repos.d/xlnx.repo used on this host:
yum install -y \
  https://dl.fedoraproject.org/pub/epel/epel-release-latest-9.noarch.rpm

dnf makecache
Install the validated package set (here u55c as an example):
dnf install \
  xilinx-u55c-gen3x16-xdma-base-3-3494559.noarch \
  xilinx-u55c-gen3x16-xdma-validate-3-3506150.noarch \
  xilinx-sc-fw-u55-7.1.22-1.b8c3d15.noarch \
  xilinx-cmc-u55-1.5.25-3395704.noarch
Validate the guest installation. The guest BDF may change, so discover it first:
lspci -nnk | grep -i -A4 -B1 -E 'Xilinx|AMD'
source /opt/xilinx/xrt/setup.sh
xrt-smi examine
xrt-smi validate -d <guest-user-PF>
If the firmware files are present but reported as unreadable:
chmod -R a+r /lib/firmware/xilinx
restorecon -Rv /lib/firmware/xilinx
Turning the VMs in a K8s cluster
With KVM, it was possible to set up 4 different VMs with a chosen flavour in terms of virtualized hardware and software. The next step to provide a computing platform is to setup a Kubernetes Cluster which will allow to host all the services needed for the research environment, from authentication to end-user tools for launching code.
To streamline the process of setting up the cluster, RKE2, also known as Rancher Kubernetes Engine 2 [RKE2], was used. It is a Kubernetes distribution developed by Rancher (now part of SUSE) that emphasizes security, stability, and ease of deployment. It’s designed to be fully Kubernetes-conformant, meaning it behaves in accordance with the official Kubernetes standards and APIs, making it compatible with standard Kubernetes tooling and workloads.
RKE2 is packaged as a single binary, which simplifies installation and maintenance. This binary includes everything needed to run a Kubernetes node, including the container runtime (which is containerd, rather than Docker), as well as the control plane and networking components. This design eliminates many of the dependencies and complexities found in traditional Kubernetes setups.
Listing 4 can be used to install RKE2 on the master node:
mkdir -p /etc/rancher/rke2/
echo """
tls-san:
  - 192.168.122.59
  - 10.10.142.115
""" > /etc/rancher/rke2/config.yaml
curl -sfL https://get.rke2.io | sh -
systemctl enable rke2-server.service
systemctl start rke2-server.service
sudo cp /etc/rancher/rke2/rke2.yaml /home/clouduser/
sudo chown clouduser /home/clouduser/rke2.yaml
export KUBECONFIG=/home/clouduser/rke2.yaml
Listing 5 can be used to install RKE2 on the worker node:
#!/bin/bash
mkdir -p /etc/rancher/rke2/
echo """
server: https://10.10.142.115:9345
token: K10e67c7985e7db4f9ed9b0353ae10f53c179a51eb4ed8443ca8596873a3327188d::server:c5cb82b52a5650b010f9e3e5f6e76b52
node-name: worker-1
""" > /etc/rancher/rke2/config.yaml
curl -sfL https://get.rke2.io | INSTALL_RKE2_TYPE="agent" sh -
systemctl enable rke2-agent.service
systemctl start rke2-agent.service
Where node-name is the name of the worker node, which can be set to worker-1, worker-2, etc. depending on the number of worker nodes in the cluster.
Using RKE2, the computing architecture shown in Fig. 8 was built:
The bare-metal server stands as foundation for all virtualization layers above;
The Kubernetes cluster is made up of three Virtual Machines created using KVM and can comunicate through a private network;
The Master node is accessible from the host.
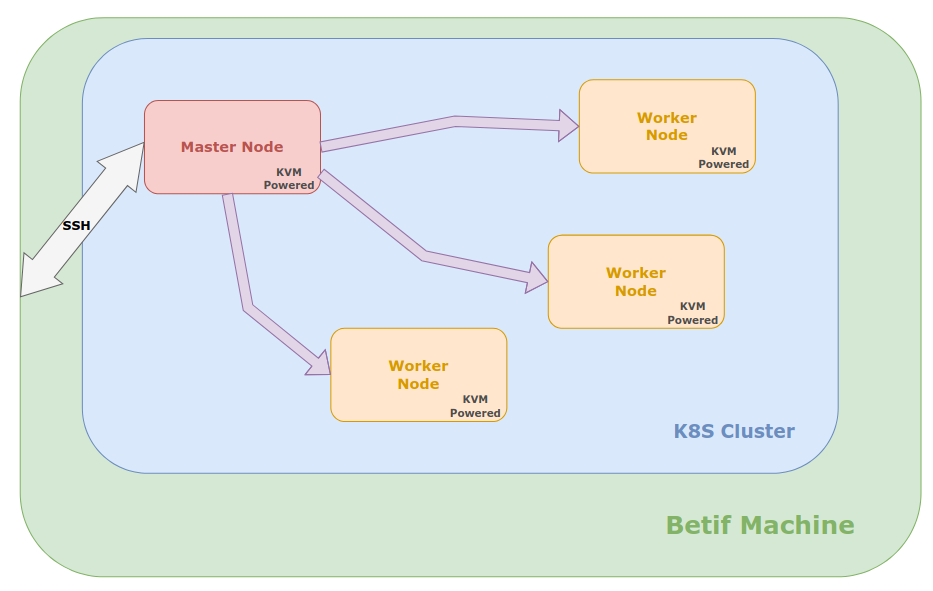
Fig. 8 Schematic of the BETIF-DIFAET architecture.
Deploying the BETIF-DIFAET jhub platform
Once the Kubernetes cluster is set up with RKE2, on the master node the kube-config file is available at /home/clouduser/rke2.yaml. This file can be used to interact with
the Kubernetes cluster using kubectl, the command-line tool for Kubernetes.
Danger
The kube-config file contains sensitive information, such as the token used to authenticate with the cluster. It should be kept secure and not shared publicly.
Important
Currently, the BETIF-DIFAET platform does not have a DNS resolved domain name. Therefore, the IP address of the master node is used to access the platform. To create an user-friendly
domain name, add the following line to the /etc/hosts file:
123.456.789.012 betif-difaet.jhub
where 123.456.789.012 is the IP address of the master node.
The BETIF-DIFAET platform is deployed using Helm charts [HELM], which are packages of pre-configured Kubernetes resources. The recipe for deploying the platform is available in the charts repository.
The steps to deploy the platform are as follows:
Install Helm: Ensure that Helm is installed on the same machine where you connect and control the Kubernetes cluster. An example of how to install Helm is shown here.
Add the following requirements:
Cert-Manager:
kubectl apply -f https://github.com/cert-manager/cert-manager/releases/download/v1.13.2/cert-manager.yaml
kubectl apply -f https://github.com/cert-manager/cert-manager/releases/download/v1.13.2/cert-manager.crds.yaml
Label nodes with no GPU, to perform node selection during the deployment of the JupyterHub platform:
kubectl label node worker-N nvidia.com/gpu.present=false
This is not needed for the node with the GPU, which will be automatically detected by the NVIDIA device plugin (see later).
NFS external provisioner:
helm repo add nfs-subdir-external-provisioner https://kubernetes-sigs.github.io/nfs-subdir-external-provisioner/
helm repo update
kubectl create namespace kube-storage
helm install nfs-provisioner nfs-subdir-external-provisioner/nfs-subdir-external-provisioner \
  --namespace kube-storage \
  --set nfs.server=<NFS_SERVER_IP> \
  --set nfs.path=/srv/nfs/k8s
where <NFS_SERVER_IP> is the IP address of the NFS VM created earlier.
Deploy the BETIF-DIFAET platform: Use the Helm chart to deploy the platform.
git clone git@github.com:BETIF-DIFAET/charts.git
cd charts/stable/jhubaas
helm repo add jupyterhub https://jupyterhub.github.io/helm-chart/
helm dependency build
kubectl create namespace jhub
helm upgrade --install --cleanup-on-fail --namespace jhub jhub ./
The last command deploys the JupyterHub platform in the jhub namespace of the Kubernetes cluster. The deployment will take a few minutes to complete, and you can monitor the status of the pods using:
kubectl get pods -n jhub
Once the deployment is complete, you can access the JupyterHub platform using the IP address of the master node. If you have set up a domain name in your /etc/hosts file,
you can access it using that domain name as well (in this case betif-difaet.jhub).
Customizing the jhub
To customize the JupyterHub configuration, you can modify the values.yaml file in the Helm chart directory. This file contains various configuration options for JupyterHub,
including authentication methods (currently the Einstein Telescope IAM instance), resource limits, and more.
Once you have made your changes to the values.yaml file, you can apply them by running:
helm upgrade --install --cleanup-on-fail --namespace jhub jhub ./
Adding CVMFS to the cluster
To add CVMFS support to the Kubernetes cluster, a dedicated Helm chart is available in the charts repository.
The installation can be done by following these steps:
Clone the charts repository (if not already done):
git clone https://github.com/BETIF-DIFAET/charts.git
Deploy the CVMFS service:
git clone -b release-2.0 https://github.com/BETIF-DIFAET/cvmfs-csi.git
helm install cvmfs ./cvmfs-csi/deployments/helm/cvmfs-csi -f ./charts/stable/cvmfs/config.yaml -n jhub
kubectl create -f ./charts/stable/cvmfs/volume-storageclass-pvc.yaml
kubectl create -f ./charts/stable/cvmfs/cvmfs-idler-daemonset.yaml
Customizing cvmfs
To customize the CVMFS configuration, you can modify the config.yaml file in the charts/stable/cvmfs/ directory. This file contains various configuration options for CVMFS,
Uninstall CVMFS
Warning
Before uninstalling the Helm package, delete first the cvmfs-idler-daemonset resource to avoid corrupting the cvmfs-idler pods (causing them to go in Error state, for SIGKILL).
To uninstall the CVMFS Helm package, run:
kubectl delete daemonset cvmfs-idler-daemonset -n jhub
helm uninstall cvmfs -n jhub
Adding GPU support to the cluster
To add GPU support to the Kubernetes cluster, the steps above to set up the GPU worker node must be followed. Once the node is ready, the NVIDIA GPU Operator is used to manage the GPU resources in the cluster. The dedicated Helm chart installation is available in the charts repository.
The installation can be done by following these steps:
Clone the charts repository (if not already done):
git clone https://github.com/BETIF-DIFAET/charts.git
Deploy the NVIDIA GPU operator:
kubectl create namespace gpu-operator
kubectl create -f ./charts/stable/gpu-operator/time-slicing-config.yaml
kubectl create -f ./charts/stable/gpu-operator/gpu-operator.yaml
The GPU operator will automatically detect the GPU on the worker node and manage its resources. The time-slicing-config.yaml file is used to configure the GPU time slicing feature, which allows multiple pods to share the same GPU.
Note
Currently, the GPU time slicing is set for 10 replicas, which means that up to 10 pods can share the same GPU. This setting can be adjusted in the time-slicing-config.yaml file.
Uninstall GPU operator
To uninstall the GPU operator Helm package, run:
kubectl delete helmchart gpu-operator -n kube-system
helm delete namespace gpu-operator
Adding VM from different Hypervisor to the cluster
1. Join VM to RKE2
Use the existing site helper script:
cd /home/clouduser/helper-scripts/rke2
./install_worker_fpga.sh
The final RKE2 configuration on VMb must contain the routed node address:
server: https://<RKE2_SERVER_IP>:9345
node-ip: <FPGA_WORKER_IP>
Restart and inspect the agent:
Basic connectivity checks from VMb:
ping -c 3 <RKE2_SERVER_IP>
nc -vz <RKE2_SERVER_IP> 9345
curl -vk https://<RKE2_SERVER_IP>:9345/ping
ping -c 3 <EXTERNAL_TEST_IP>
2. Check the node and Flannel address
From a control-plane node:
kubectl get nodes -o wide
kubectl get node <fpga-node> -o yaml | \
  grep -E 'flannel.alpha.coreos.com/public-ip|InternalIP' -A2
Both addresses must be <FPGA_WORKER_IP>.
If Flannel retains the old NAT address, apply the override and restart only the Canal pod on VMb:
kubectl annotate node <fpga-node> \
  flannel.alpha.coreos.com/public-ip-overwrite=<FPGA_WORKER_IP> \
  --overwrite

kubectl -n kube-system get pods -o wide | grep canal
kubectl -n kube-system delete pod <canal-pod-on-vmb>
Verify VXLAN traffic on VMb:
tcpdump -ni any udp port 8472
The outer source for traffic from VMb must be <FPGA_WORKER_IP>, not <OLD_NAT_IP>.
3. FPGA Operator checks
The Xilinx FPGA Operator release and values are maintained separately. After the worker joins, check that its components run on the FPGA worker:
kubectl -n xilinx-system get pods -o wide
kubectl get node <fpga-node> --show-labels
kubectl describe node <fpga-node>
The node must expose an amd.com/... FPGA resource before scheduling an FPGA workload.
For NFD, JupyterHub or other pods timing out across nodes, test the remote pod IP directly and capture VXLAN on VMb:
nc -vz <remote-pod-ip> <port>
tcpdump -ni any udp port 8472
4. Checks after a Hypervisor reboot
HyperB:
virsh net-list --all
ip route get <RKE2_SERVER_IP>
sysctl net.ipv4.ip_forward
iptables -t nat -S POSTROUTING
Required state:
k8s-routed active
<RKE2_SERVER_IP> via <HYPER_A_LAN_IP> dev eno1
net.ipv4.ip_forward = 1
MASQUERADE rule for <FPGA_WORKER_SUBNET> on eno1
5. FPGA Checks after a Hypervisor reboot
If the VM is not running, bind the two FPGA functions to vfio-pci as in section 3 and start it.
VMb:
ip route
ping -c 3 <RKE2_SERVER_IP>
ping -c 3 <EXTERNAL_TEST_IP>
systemctl status rke2-agent --no-pager
source /opt/xilinx/xrt/setup.sh
xrt-smi examine
Control plane:
kubectl get nodes -o wide
kubectl -n xilinx-system get pods -o wide